Nagios is a host and service monitor designed to inform you of network problems before your clients, end-users or managers do. It has been designed to run under the Linux operating system, but works fine under most *NIX variants as well. The monitoring daemon runs intermittent checks on hosts and services you specify using external "plugins" which return status information to Nagios. When problems are encountered, the daemon can send notifications out to administrative contacts in a variety of different ways (email, instant message, SMS, etc.). Current status information, historical logs, and reports can all be accessed via a web browser.
Yesss!!!!!! i got it, since last year im looking for job. finally i got it. Now, i'm working in one of government-agency company-> MREPC. nice place, nice friend and nice salary...huh!
hi, guys. since last april i have been missing . actually, i went for vacation and take a long rest...and at the same time.. looking for new job. hahahah. funny rite? :-p
finally, i solve my problem to create graph using PHP. almost 2 and half years looking for it. The concept is simple. What you need is you have to download PHPlot class for the here.Just follow the instruction given. happy ending story. bye
We all know that using proxy is a method to connect to Internet for the LAN user. But do you know how to make a proxy server in your PC? There are many proxy server softwares in Windows such as WinGate and SyGate. However I will introduce you a Linux software today, it names Squid. You can find it in most versions Linux OS. I will give you a little basic knowledge first. A proxy server software is based on the TCP/IP protocol. It monitors a special port such as 3128. A computer who runs a proxy server software is called a proxy server. If other computer want to connect to Internet through the proxy server, it should know the proxy server's IP address and proxy port such as 3128, which is used to config the communication software such as IE and ICQ. The main function of proxy server is: The proxy server can cache the website content that the clients visited, which can speed up the second visit. The proxy server can give you access to the forbidden site. For example, the LAN administrator forbid your access to my-proxy.com, but you can also visit it through a proxy. The proxy server can control the accesses of its clients. I will tell you more about it below. Maybe you know another Linux software IPchains, which can also used as a access control tool. But the problem is that IPchains doesn't support DNS parsing. You have to list all the IP address of the websites you want to control. However it's different for Squid, you can simply forbid the access to the domain whose suffix is .tw or .cn by Squid while the DNS parsing is the work of ISP. Now I will give you a example. We use a PC which has two network cards as our proxy server. The first network (eth0) connects to local area network (LAN) and the second one (eth1) connects to Internet. We use the RedHat Linux 8.0 and Squid (which comes with the OS). Just like other Linux software, Squid works according to its config files. Its default config file is /etc /squid /squid.conf. It is more than ten pages and contains the config specification. However there are only a small part of them we will use, I list the most important options below. Most of them are open-and-shut. http_port 3128 #the port that the proxy server monitors cache_dir /var/cache/squid 100 16 32 #cache dir size(MB), the number of first level subdir, the number of second level subdir cache_access_log /var/log/squid/access.log cache_log /var/log/squid/cache.log acl all src 0.0.0.0/0.0.0.0 acl head src 192.168.0.2/255.255.255.255 192.168.0.3/255.255.255.255 acl normal src 192.168.0.21-192.168.0.99/255.255.255.255 acl denysite dstdomain tw cn acl denyip dst 61.136.135.04/255.255.255.255 acl dnsport port 53 http_access allow head http_access deny denysite http_access deny denyip http_access allow normal http_access deny dnsport We can know from the config file that: Squid will monitor the port 3128 The cache dir is /var/cache/squid and its size is 100MB The users 192.168.0.2 and 192.168.0.3 can access all the websites The users 192.168.0.21-192.168.0.99 can't visit the website whose domain suffix is .tw or .cn The users 192.168.0.21-192.168.0.99 can not visit the website whose IP is 61.136.135.4 Other users can not connect to server whose port is 53 It's obvious that the config file use keyword "acl" to define user groups & destination groups and use "http_access" to control the access of the groups. There different keywords after "acl" such as "src","dst","proto","port" and "dstdomain". You can also use "acl
hi guys, nice to meet u all again. this time, i what to show a very simple project done by me yesterday. Eventough it is not yet complete, but i manage to discover what PHP can do more. I name it as Sharing File Sytem (Filesys). I got this idea when all department need to have sharing file system. This is to permit them to share their files across the department without having any intruption or seen by students. Before developing this system, i have tried several softwares that related to file sharing system. Some of them are shareware and freeware. However, i tried to search system that can be customized based of our preference. My findings, is almost all s/w are already customized and leads to my attention to develop my own way system. All i need to develop this tiny system are as usually using PHP (my favorite). No database required as i want make it as simple as i can.
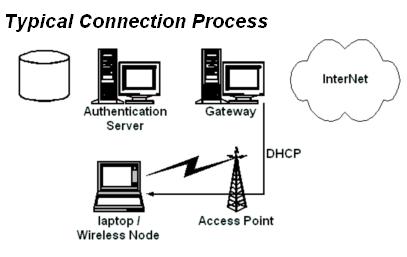
Happy new year 2007 guys! may allah bless and prosper your life. ok guys, my topic for this month is to discuss about the process or step-by-step in setuping DHCP in your network or LAN. First or foremost, what we should know is the concept of DHCP itself. DHCP - Dynamic Host Configuration Protocol, is set of rules used by a communications device such as a computer, router or networking adapter to allow the device to request and obtain an IP address from a server which has a list of addresses available for assignment. In other words, we as network adminstrator no need to set IP for each pcs. it is done once user switch on the pc and wallah internet connectivity is ready. However, thing to remind is, the particular pc should be address with the valid DNS- Domain Name Server. In not, we just only establishing connection for LAN but not Internet.
-> is a process whereby one host sends a flood network traffic to another host. By flooding the network would caused "denial of service" or DoS attacks. the target host is unable to handle heavy load of data that is received. Due to this implication, the whole bandwidth for target host is eaten by the sender host. i have tried it using free source software called xxpoof. if you wish to try it, responsibility is under you and implication is effect immediately. for downloading, just click into this link http://www.buha.info/files/user/html/id_Tools_xxpoof_266.html.
VNC stands for Virtual Network Computing. It is remote control software which allows you to view and interact with one computer (the "server") using a simple program (the "viewer") on another computer anywhere on the Internet. The two computers don't even have to be the same type, so for example you can use VNC to view an office Linux machine on your Windows PC at home. VNC is freely and publicly available and is in widespread active use by millions throughout industry, academia and privately.
what is putty?
PuTTY is a free implementation of Telnet and SSH for Win32 and Unix platforms, along with an xterm terminal emulator.
1. Go to Start / Settings / Network Connections 2. Start the New Connection Wizard
3. Click on the Next button 4. Select Set up advanced connection
5. Click on the Next button. 6. Click on Accept incoming connections
7. Click on the Next button 8. At the LPT1 page, skip it and just click on the Next button.
9. Click on Allow virtual private connection
10. Click on the Next button 11. Add user accounts that you want to be able to connect to your WindowsXP computer.
12. Click on the Next button. 13. Highlight Internet Protocol (TCP/IP) and click on Properties
14. Determine how you want the remote computers to get their IP address
19. The above example will assign IP addresses to each client. Make sure the IP scheme is the same as on your server.
20. Submitted by Andy Bloss If the VPN server is behind a router, Port Mapping will need to be done on the router. Standard port usage is 1723 for PPTP. You might also need to configure your router for PPTP Passthrough. Port usage for IPSec is 500, 50-51. These ports will have to be forwarded to the VPN server's IP
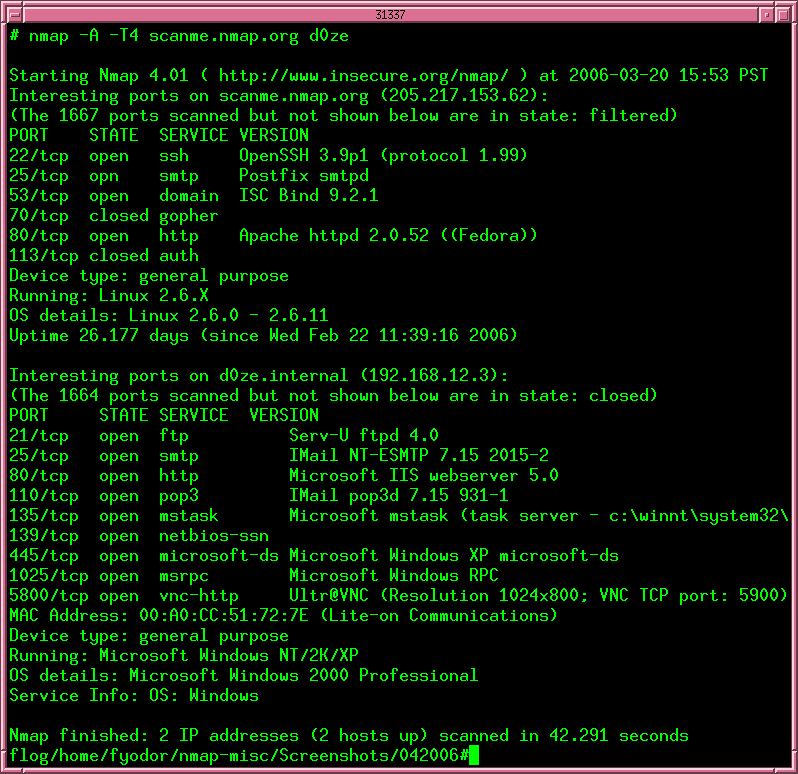
Flexible: Supports dozens of advanced techniques for mapping out networks filled with IP filters, firewalls, routers, and other obstacles. This includes many port scanning mechanisms (both TCP & UDP), OS detection, version detection, ping sweeps, and more. See the documentation page.
Powerful: Nmap has been used to scan huge networks of literally hundreds of thousands of machines.
Portable: Most operating systems are supported, including Linux, Microsoft Windows, FreeBSD, OpenBSD, Solaris, IRIX, Mac OS X, HP-UX, NetBSD, Sun OS, Amiga, and more.
Easy: While Nmap offers a rich set of advanced features for power users, you can start out as simply as "nmap -v -A targethost". Both traditional command line and graphical (GUI) versions are available to suit your preference. Binaries are available for those who do not wish to compile Nmap from source.
Free: The primary goals of the Nmap Project is to help make the Internet a little more secure and to provide administrators/auditors/hackers with an advanced tool for exploring their networks. Nmap is available for free download, and also comes with full source code that you may modify and redistribute under the terms of the license.
Well Documented: Significant effort has been put into comprehensive and up-to-date man pages, whitepapers, and tutorials. Find them in multiple languages here.
Supported: While Nmap comes with no warranty, it is well supported by the community and we appreciate bug reports and patches. If you encounter a problem, please follow these instructions.
Acclaimed: Nmap has won numerous awards, including "Information Security Product of the Year" by Linux Journal, Info World and Codetalker Digest. It has been featured in hundreds of magazine articles, several movies, dozens of books, and one comic book series. Visit the press page for further details.
Popular: Thousands of people download Nmap every day, and it is included with many operating systems (Redhat Linux, Debian Linux, Gentoo, FreeBSD, OpenBSD, etc). It is among the top ten (out of 30,000) programs at the Freshmeat.Net repository. This is important because it lends Nmap its vibrant development and user support communities.
im still doing my research on this... until now i have successfully setuped gateway for Nocat, but no yet settle with authentication maybe around 90% to finish it. This is due to time constraint and routine jobs that i have to do everyday. recently, my company is having ISO 9002 :2000 auditing and alot of management issue such as filing, memos, updating inventory records. hopefully that this coming month, i could finish my project and upload my guidelines A.S.A.P.
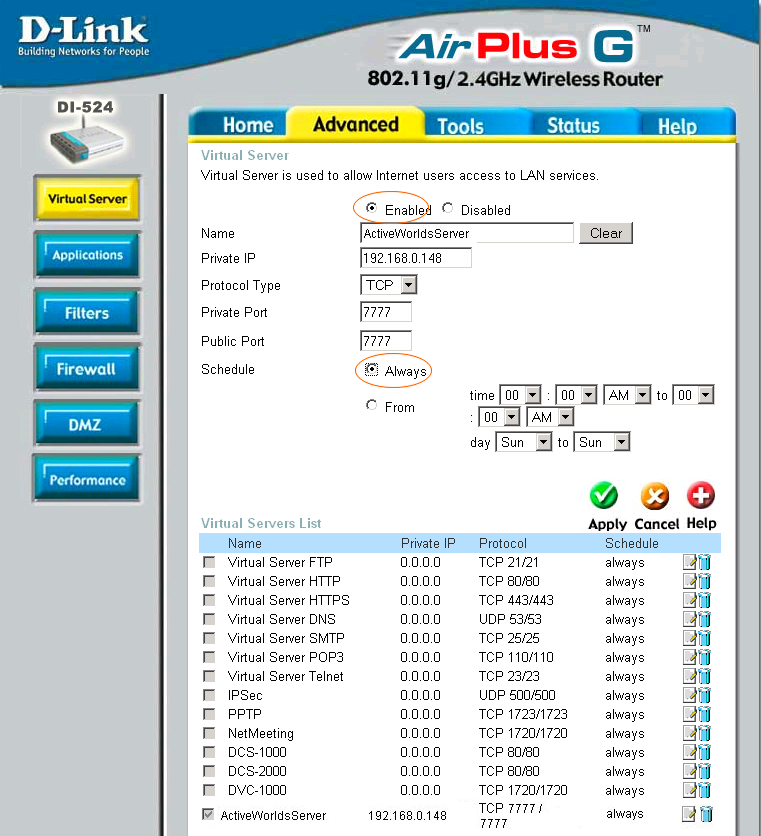
hi guys, i'm back. my topic today is to share with you my experience on installing home-based server for my company. actually, company that i worked is just education-based company where medium sized server is required with a very low cost. First thing i did, was OS (FC 5- according to me) should be installed and port for telnet, ftp should be opened for you do remote access. Once you have done, connect your server to internet. During this phase you supposed to configure the IP address, DNS and netmask properly. Then, adjust your modem+router (in my case) in VIRTUAL SERVER section. type IP address of your server into it. This is to allow certain IP address can be accessed from outside. Once you finished, you have to know your Public IP address, this is to make links directly into your website.... and it's done.... try it! happy testing
some people when they forgot admin password, it's like "end of the world". However, there is way to cater the problem. since i worked as manager cam network admin and system admin, i had faced this kind of problem and i did some research on it. It come across when i searched over www.google.com (the best search engine!!). the link is as follows
this website provides to you step-by-step on how to break through your system and demolish the existing password. the author proposed 3rd party tools in which it is free to use.
Here are 5 of these free tools: Windows Password recovery - Can retrieve forgotten admin and users' passwords in minutes. Safest possible option, does not write anything to hard drive. Petter Nordahl-Hagen's Offline NT Password & Registry Editor(recommended)- A great boot CD/Floppy that can reset the local administrator's password. Openwall's John the Ripper - Good boot floppy with cracking capabilities. EBCD – Emergency Boot CD - Bootable CD, intended for system recovery in the case of software or hardware faults. Austrumi - Bootable CD for recovering passwords and other cool tools
I have tried using all the tools and successfully hacked my friend's pc using these tools...hehheh :-)

 Nagios is a host and service monitor designed to inform you of network problems before your clients, end-users or managers do. It has been designed to run under the Linux operating system, but works fine under most *NIX variants as well. The monitoring daemon runs intermittent checks on hosts and services you specify using external "plugins" which return status information to Nagios. When problems are encountered, the daemon can send notifications out to administrative contacts in a variety of different ways (email, instant message, SMS, etc.). Current status information, historical logs, and reports can all be accessed via a web browser.